Billing for laboratory test kits takes more than just submitting a charge. It requires accuracy, attention to detail, and a clear understanding of each kit’s contents. Whether you work in a clinical lab, hospital, or private practice, you must identify individual tests in a lab kit.
Each test in a kit must match the correct Current Procedural Terminology (CPT) code. Insurance companies and government payers use these codes to process claims and reimburse services. Missing or incorrectly coding even one test can cause claim denials or delayed payments.
This guide helps you learn how to identify components of a laboratory test kit for billing. You will learn how to find matching CPT codes, apply necessary modifiers, and follow payer guidelines for clean claims. We’ll also share a checklist and workflow chart to help you bill confidently.
But first, let’s go through a quick example to see the process in action.
Sample Scenario: How It All Comes Together
You receive a laboratory kit that contains the following tests:
- Glucose
- Creatinine
- Sodium
- Potassium
You check your CPT resources and find:
- Glucose = 82947
- Creatinine = 82565
- Sodium = 84295
- Potassium = 84132
You check if this matches a known panel. A Basic Metabolic Panel (BMP) requires additional tests like calcium, chloride, and BUN. Since your kit is missing some of those, you cannot use the panel code (80048) for BMP.
Instead, you must bill each test individually using the CPT codes listed above. Next, you check whether any modifiers are required. In this case, it’s a single run of each test, so no modifier is needed.
Finally, you document the tests, results, CPT codes, date/time, and the diagnosis code provided by the physician. You then submit the claim. This process ensures correct coding, clean documentation, and a higher chance of claim approval.
How to Identify Components of a Laboratory Test Kit for Billing
When billing for a laboratory test kit, it’s important to know what tests are included and how to code them properly. Each test has a special billing code, called a CPT code. This code tells insurance companies what service was done so they can pay for it.
CPT stands for Current Procedural Terminology. The American Medical Association (AMA) maintains and updates these codes every year. If you bill the wrong code or leave something out, it can lead to denied claims or lost revenue.

Let’s walk through the process of identifying lab test components and assigning the correct CPT codes. It involves six simple steps.
1). Identify the Lab Tests
First, open the lab test kit and carefully check what tests are included. Some kits may have just one test. Others may include a group of tests, called a panel.
For example, a Basic Metabolic Panel (BMP) often includes:
- Glucose
- Sodium
- Potassium
- Chloride
- Carbon dioxide (CO₂)
- Blood urea nitrogen (BUN)
- Creatinine
- Calcium
You must list all individual tests in the kit. Read the kit instructions or documentation. If anything is unclear, contact the manufacturer or supplier for details. Don’t assume what’s inside; verify it.
Why is this step important? Because billing depends on exactly what was done. A small difference in the test panel can change the CPT code. That’s why, we always recommend outsourcing lab billing services from certified and experienced specialists.
Some other common panels include:
- Comprehensive Metabolic Panel (CMP)
- Lipid Panel
- Thyroid Panel
- Liver Function Tests (LFTs)
If your kit does not come with an official name, break it down by its components and build your coding from the bottom up.
2. Find the Corresponding CPT Codes for Tests
Once you’ve identified the tests, the next step is to find their CPT codes. You can look them up in the CPT manual, or use trusted online resources like the AAPC (American Academy of Professional Coders) or CMS (Centers for Medicare & Medicaid Services).
Each lab test has a specific CPT code. For example:
- Glucose (blood) = 82947
- Sodium = 84295
- Potassium = 84132
- Creatinine = 82565
If the test is a common panel, you might find a single code that covers the entire group. For example:
- Basic Metabolic Panel (BMP) = 80048
- Comprehensive Metabolic Panel (CMP) = 80053
You can’t just guess these codes. You must use official sources and stay updated each year. New tests may get new codes, and old codes may change or be deleted.
Note: Note the difference between qualitative and quantitative tests. For example, a test that just says “positive” or “negative” might have a different code than one that gives a numeric value.
Quick Example of (Qualitative vs Quantitative Coding)
Here’s a quick example to show how coding changes based on whether the test is qualitative or quantitative. Even if you’re testing for the same thing — like hCG in a pregnancy test — the CPT code will differ depending on whether the result is a simple “positive/negative” or a measured value.
| What the lab does | How the result looks | Correct CPT code | Why it fits |
| Urine “dip-stick” pregnancy screen | Simply “positive” or “negative” | 81025 (or 84702 if serum/other specimen) | This is a qualitative test because it answers yes / no instead of giving a number. |
| Serum β-hCG level | Numeric value, e.g., “1 200 IU/L” | 84703 | This is a quantitative test because it reports the exact concentration. |
Even though both tests look for the same hormone, the billing code changes once you move from a yes-or-no screen to a numeric measurement. Make sure your chargemaster lists the right code for the method you actually run and update it each year when CPT changes roll out.
3). Consider Modifiers for Lab Tests
Sometimes, just using a CPT code isn’t enough. So you may also need to add a modifier. A modifier gives extra information about the service.
Common modifiers include:
- Modifier 59: Used when you do two distinct tests that are usually done together, but were done separately in this case.
- Modifier 90: Used when sending a specimen to an outside lab for testing.
- Modifier 91: Used when you repeat the same test on the same day for valid medical reasons.
- Modifier QW: Used for CLIA-waived tests (simple lab tests approved by the FDA).
Let’s say you run a glucose test in the morning, and again in the afternoon. You would use Modifier 91 on the second test. Modifiers help prevent claim denials. They also help explain unusual situations to the payer. Always double-check if a modifier is required before submitting your claim.
4). Document and Code Each Kit Component Accurately
Clear documentation links every part of the laboratory test kit to the right CPT code, which is the only way to bill without rejections.
- Record every component: List each test the kit contains, like, glucose, creatinine, hCG, or any other marker.
- Add the matching CPT code: Pull the code straight from the current CPT manual or a trusted tool such as AAPC or CMS.
- Capture the result: Include the actual value or the yes / no outcome for qualitative tests.
- Note the date and time: Time-stamping proves the service took place and supports medical necessity reviews.
- Tie in the diagnosis (ICD-10-CM): Link every test to the reason it was ordered. For example, using R73.03 for abnormal glucose.
You might be thinking, why it matters?
It’s because payers (insurance companies) compare your reimbursement request claim with what is in the chart. If even one test, code, or time stamp is missing or wrong, the entire claim can be denied or held for audit.
Here’s a useful tip for you:
Use your EHR or Lab Information System to build kit “templates.” Each time the kit is run, the system auto-fills the component list and matching CPT codes. Always review the codes before submitting the claim to catch yearly CPT updates or kit changes.
5). Consider Test Panel Codes
Laboratory test kits vary depending on the condition being tested. Some kits contain just one test, while others contain a group of tests commonly used together. These are called panels, and they have their own unique CPT codes.
Here are some common panel codes:
| Panel Codes | Test Panels | Short Description |
| 80048 | Basic Metabolic Panel (BMP) | Includes tests like glucose, calcium, and electrolytes. |
| 80053 | Comprehensive Metabolic Panel (CMP) | Includes all BMP tests plus liver function tests. |
| 80061 | Lipid Panel | Includes tests for cholesterol and triglycerides. |
| 80076 | Hepatic Function Panel (Liver Function) | Measures key liver enzymes and proteins to assess liver health and function. |
| 84436 and 84479 | Thyroid Panel | Measures thyroid hormone levels by assessing T4 (thyroxine) and T3 (triiodothyronine) hormones, TSH |
To bill a panel code, all component tests in the panel must be performed. If even one test is missing, you can’t use the panel code. In that case, you must bill each test separately. Panel billing saves time and reduces the chance of errors. But only use it when the complete panel is done. Otherwise, it’s considered incorrect billing.
Quick Example on When a Panel Code Works (and When It Doesn’t)
Imagine a doctor orders a Comprehensive Metabolic Panel (CMP, CPT 80053) because the patient needs a full health check. A CMP includes 14 separate tests such as glucose, calcium, liver enzymes, and electrolytes.
| Scenario | What the lab actually runs | Can you bill the panel code 80053? | What to do |
| Complete panel | All 14 CMP tests are performed | Yes. Use 80053. | One code covers everything. Easy and accurate. |
| Missing one piece | You skip ALT because the sample clots | No. Panel rules say every component must be done. | Bill each completed test with its own individual CPT code (e.g., glucose 82947, calcium 82310, etc.). |
6). Match Kit Components to Each Payer’s Rules
Every payer has its own playbook. After you identify the tests inside a kit and choose the right CPT codes, make sure those codes line up with the payer’s billing rules.
| What to check | Why it matters for a test kit | Quick action step |
| CLIA certification | Medicare (and many commercial plans) will not pay for chemistry, molecular, or microbiology tests unless the performing lab holds the correct CLIA number for that complexity level. | Confirm the CLIA number is on every claim that includes the kit’s components. |
| Frequency limits | Panels like CMP (80053) or lipid (80061) may be limited to once every 90 days unless medical necessity is documented. | Keep a payer-specific “frequency grid” next to your charge master and have the LIS flag repeats automatically. |
| Prior authorization | High-cost genetics and next-generation sequencing kits often need approval first. | Run the payer’s PA checklist before you collect the sample. |
| Bundling rules | Some payers want a single panel code if all kit components are run; others want each test billed separately. | Store the payer’s preference in your billing software so it auto-selects the correct path. |
| Updated code sets | CPT and ICD-10 may change yearly. | Schedule an annual code scrub in December and update your kit templates on January 1. |
Practical Tip:
Build a “payer matrix” inside your Laboratory Information System. For each kit, map:
- Allowed CPT panel or individual codes
- Frequency limits
- Authorization rules
- Required modifiers or CLIA details
The system then warns you before you submit a claim that breaks a rule. If a question comes up that the matrix doesn’t answer, call the payer or ask a certified lab coder first, then update the matrix so the problem never repeats.
How a payer matrix helps you bill a lab test kit correctly?
Let’s say your lab runs a Comprehensive Metabolic Panel (CMP) test kit for a patient with BlueShield insurance.
Your payer matrix says:
- BlueShield allows code 80053 (CMP panel) only if all 14 tests are completed.
- You can only bill once every 90 days unless there’s a medical reason.
- No prior authorization is needed.
- You must include your CLIA number on the claim.
Now imagine this:
- One of the tests in the kit (like ALT) fails because the sample clotted. You only completed 13 tests.
- The system reads your matrix and automatically stops you from using 80053, because the full panel wasn’t done.
- It tells you to bill each test separately instead.
That’s how the payer matrix protects you. It helps avoid mistakes before you send the claim, so you don’t get denied or audited later.
If you are unsure, reach out to the payer directly or consult a certified, lab-specific medical coder. This is also a more practical approach to billing your lab procedures.
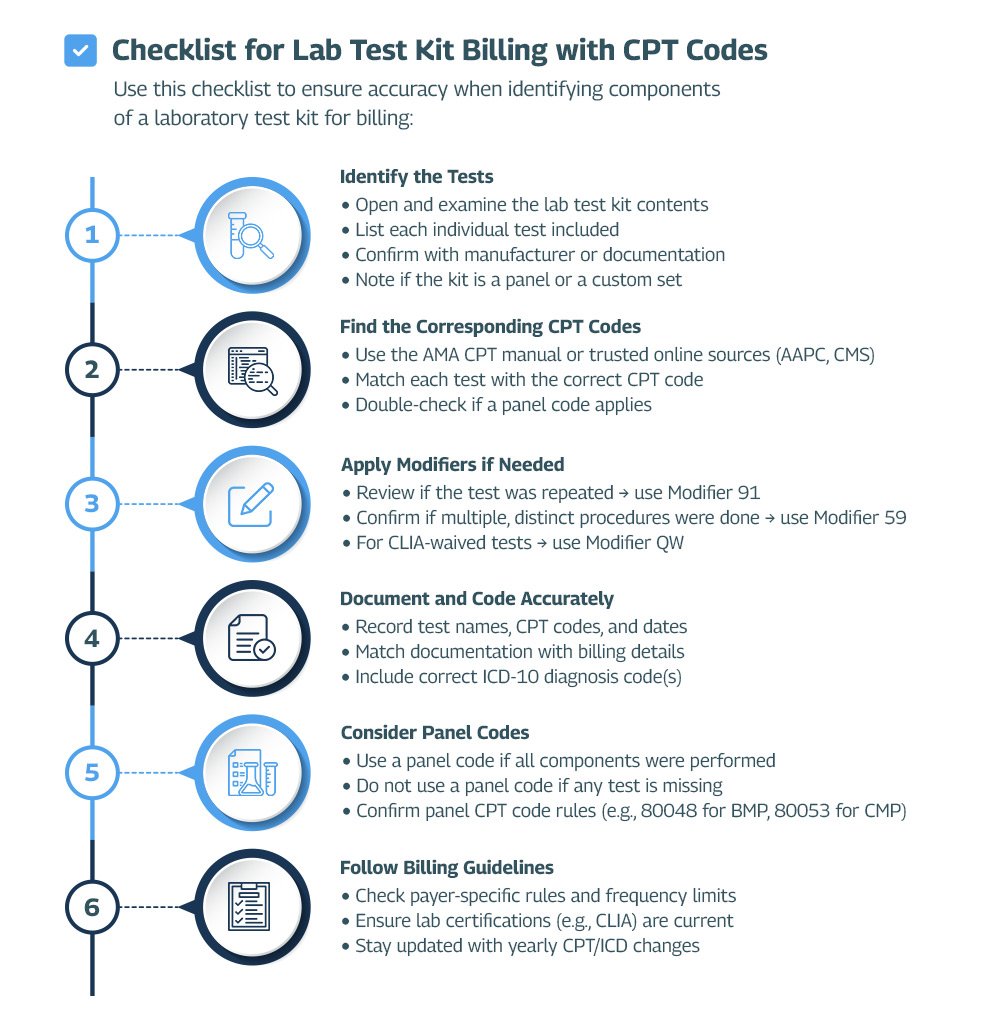
✅ Checklist: How to Identify Components of a Lab Test Kit for Billing (Using CPT Codes)
Use this checklist to correctly break down and bill for every component inside a laboratory test kit:
🔍 Step 1: Identify Each Test in the Kit
- Open the test kit and review all included components
- List every individual test (e.g., glucose, creatinine, hCG)
- Confirm components with manufacturer instructions or kit insert
- Note if the kit qualifies as a standard panel (e.g., CMP) or is a custom mix
📘 Step 2: Find the Correct CPT Code(s)
- Use the AMA CPT manual, AAPC, or CMS lookup tools
- Assign the accurate CPT code for each test
- If the kit qualifies as a full panel, check if a single CPT panel code applies
- Always double-check codes for qualitative vs. quantitative versions
✍️ Step 3: Apply Modifiers When Required
- Use Modifier 91 for repeat lab tests
- Use Modifier QW for CLIA-waived tests (if applicable)
- Use Modifier 59 for distinct procedural services when tests overlap but are billed separately
📝 Step 4: Document Everything Accurately
- Record the test names, CPT codes, date/time performed
- Include the ICD-10 diagnosis code that supports medical necessity
- Ensure chart documentation matches what is billed — word-for-word
- Note any test issues (e.g., incomplete kit or failed test due to clotted sample)
🧪 Step 5: Use Panel Codes Only If Fully Performed
- Use a panel CPT code (e.g., 80053 for CMP) only if all tests in the panel were completed
- If any test was skipped or failed, bill individual CPT codes instead
- Always cross-check the payer’s rule for panel billing eligibility
📋 Step 6: Follow Payer-Specific Billing Guidelines
- Check the payer’s policy for frequency limits, prior authorization, and CLIA requirements
- Stay current with annual CPT and ICD-10 updates (new codes come each January)
- Use your LIS or billing software to track and follow rules for each payer
❌ Mistakes to Avoid When Billing Laboratory Test Kits
Even skilled lab billers can make costly errors when translating a lab test kit into CPT-coded claims. Below are critical mistakes specific to lab kit billing that lead to denials, audits, or underpayments.
🔴 Billing a Panel Code Without Running the Full Panel
If your lab kit includes a recognized panel (like CMP – 80053), you can only bill the panel code if every required component was performed and resulted.
❗ Example: If ALT fails due to a clotted sample, you must unbundle and bill each test separately — or the panel claim will be denied as incomplete.
🔴 Using Expired or Incorrect CPT Codes for Kit Components
CPT codes are updated annually, and even a small change (e.g., description, status, or bundling rule) can impact reimbursement.
✅ Always use the current year’s CPT code set when mapping each test in the kit.
🔴 Missing Critical Modifiers for CLIA or Repeat Testing
Certain lab tests in kits require specific modifiers based on how they’re performed or billed:
- Modifier QW for CLIA-waived tests
- Modifier 91 for repeat testing on the same day
- Modifier 59 for distinct procedural services in bundled kits
❗ Leaving these off will often trigger automatic payer rejections.
🔴 Overlooking Payer-Specific Rules for Kit Components
Different payers have unique guidelines for lab kits, including whether they allow panel billing, how often a test can be billed, or if prior authorization is required.
🔴 Thinking You Can Bill Every Test in the Kit One by One
Some labs make the mistake of billing each test in the kit separately, hoping to get paid more. But that doesn’t always work. Many insurance companies treat certain tests as a group and only pay for the group as a whole. Others may see the tests as part of a routine checkup and won’t pay for them on their own.
Let’s say this happens ➜ Your lab kit includes 4 different tests. You try to bill all 4 using separate CPT codes. But the insurance only allows payment for 1 because they see the tests as part of a single package or visit. So 3 of them get denied.
That’s why it’s important to check the payer’s rules before billing.
Get Help with Lab Test Kit Billing
Most labs lose revenue because one kit component is coded wrong or a panel rule is missed. Our lab billing company audits your top-volume kits line by line, matches each test to the latest CPT code set, and shows you exactly where under-payments hide.